
Welcome to the
Fenly Support Center
Table of Contents
An Introduction to Fenly
Created by a food bank, for food banks
Fenly is designed to help you raise more without creating more work for you or your team.
With Fenly, setting up Crowdfunding campaigns, Virtual Food Drives, and Peer-to-Peer Fundraising are easy and never require the help of a website designer or programer.
Fenly is not a widget or a plugin. It is a custom site, with its own subdomain, created just for your organization. You can share your Fenly link on your social media pages, in email newsletters, and link to it from your main food bank website.
You can also feel secure in sharing your Fenly site and in collecting donations through Fenly. Thanks to SSL protocol, all sensitive data collected on the platform remains encrypted which allows your site to remain safe and secure.
We want to get you set up and raising funds with Fenly as soon as possible. To help, we have created this easy to follow Admin Guide. We recommend working through the guide in order and also bookmarking this page for future reference.
As always, if you have any additional questions or issues, make sure to reach out to our expert support team at help@fenly.org
The Fenly Basics
Log In to the Fenly Backend Admin Dashboard
You should have received an email from our team and an automatic email from Fenly with your login URL, Username, and Password. If you don’t see the emails, be sure to check your spam folder. If you are still having issues, let our support team know at help@fenly.org and we will be sure to resend the information.
To get started, you will want to visit the Login screen of your custom Fenly subdomain. The link will look similar to – YourCustomSubdodev-fenly-sl.pantheonsite.io/wp-login.php
The Username and Password will be the ones provided by our team in the initial emails. Your Username is based off the admin contact email you gave us. Your password can also be reset on the login page if necessary.
Once logged in, you will be in the Fenly backend Admin Dashboard. This will allow you to customize, optimize, and analyze all of your organization’s online fundraising efforts.
Setting Your Fenly Email and Tagline
Once you are logged into the Fenly backend Admin Dashboard, customize the General Settings of your Fenly site.
Using the navigation menu on the left, hover over Settings and then select the General option.This is where you will be able to customize your Fenly site Title and Tagline to match your organization’s branding.
You will also be able to double check or change your admin Email Address and preferred Time Zone.
Connect Your Stripe Account
In order to collect donations on your Fenly site, you will need to connect to Stripe, the built-in payment processor.
If you don’t yet have a Stripe account, you can learn more and sign up at https://stripe.com/us/pricing. In addition to Stripe’s credit card processing fee, Fenly will also collect a 3% fee on each transaction automatically.
To connect your Stripe account, hover over Settings in the left menu bar and select the Stripe Setup option. From there, connecting your Stripe account is as easy as clicking on the “Connect Your Stripe Account” button and authorizing access to your Stripe account. If you don’t yet have a Stripe account, clicking on this button will prompt you to set one up. If you have an account, click the “Sign in” link found on the right-hand corner of the page.
Customize Your Fenly Site
Fenly Theme Settings
Fenly is packed with customization options to help you highlight your unique organization and to increase donations. Most of these settings can be found under the main Fenly Theme Settings tab, which can be found on the left navigation menu.
Set Your Default User Fundraising Drive Settings
When your supporters set up their own Peer-to-Peer fundraisers, they have the option to not only set a goal but also write a message to donors about their fundraiser.
On the Fenly backend, you, as the Admin, can set a default goal and description for all your community’s fundraising drives. This is a great way to help your supporters maximize their efforts and increase donations.
To customize these options, head to the Theme Settings section – User Setup/Dashboard. You can set the “Default User Drive Goal” to any numeric value and customize the “Default User Drive Summary” to give your supporters a good base to work from when writing their own fundraising drive summaries.
Add Your Brand Elements
Fenly is designed to complement your organization’s website, social media pages, and other branding material. As such, we allow you to customize many brand elements on your Fenly site.
Under the Theme Settings section, Design & Global Content Options, you will be able to upload your organization’s logo and set primary and secondary brand colors which will be used throughout your Fenly website.
When uploading your logo, keep in mind that horizontal logos look best, rather than vertical or square logos. The ideal recommended size for your logo would be 140 x 36px or a similar ratio.
Customize Your Email Receipts
With Fenly, all donations to Crowdfunding campaigns, Peer-to-Peer fundraising pages, and Virtual Food Drives will automatically trigger a donation receipt email.
In the Theme Settings, you can customize these emails and personalize the automatic receipt message each donor receives.
The “Email Before Details” box is the text that will appear before the actual receipt. There is no need to include “Dear Donor,” or similar text, as the Fenly system will automatically address the email to your donor using their first name.
The “Email After Details” box allows you to add additional information after the receipt in the email sent to donors. This is a great place to thank the donor again and highlight another goal of your organization, such as encouraging the donor to volunteer or follow a social media channel.
Customize Your Fenly Page Footer
The last section of the Theme Settings page allows for the customization of your Fenly site footer. This footer will show up on every page of your Fenly fundraising site.
The footer is divided into three sections — a menu and two text-based boxes.
For the footer menu, you can set both a heading and also customize the exact pages that show in your menu by clicking on the “Menus section” link displayed in this section. You also have the option to rearrange or adjust the columns of your footer menu. Additionally, you can completely hide the menus by unchecking them under the “Display location” section of the Menu Settings. Access this functionality by clicking on the “Menus section” link or by going to Appearance and then Menus via the left navigation menu.
The text widgets are a great place to share more about your organization. In the first box, we have included a generic “About Us” summary; however, we recommend that you update this section to reflect your organization’s mission statement or your own short “About Us” text. The second text box can be set to include your organization’s phone number and email, as we have done, or be customized to include any other additional information you would like to include.
Fenly Page Content
While we have populated some of your Fenly site pages with generic content, to truly get the most value out of Fenly, we recommend customizing this content — especially the content displayed on the Home and About page.
To do so, you will need to visit the Pages section of the Fenly backend Admin Dashboard via the link in the left navigation menu.
Home Page
The Fenly homepage is designed to increase donations, motivate your supporters to start a fundraiser, and to highlight your Crowdfunding campaigns and Virtual Food Drives. Customizing the page with your own branding, images, and callouts is a great way to increase engagement.
To edit your Fenly homepage, first navigate to the backend Pages screen, via the left navigation menu, and select “Home Page — Front Page” from the list.
Scrolling down, you will see the customization section for the Home Page, starting with the “Slides” box. This is where you can upload your fundraising banner image, select a title, and customize your main Call-to-Action (CTA) button. You can even add additional slides, with different titles and CTA buttons.
Below this section, there are three additional boxes to customize your “Callouts” which can be seen on the bottom half of your Fenly homepage. We have already filled these in with engaging CTAs but they are fully customizable, from the description to the button text.
About Page
To best convert new visitors into fundraisers, donors, and supporters, we recommend also customizing the “About Us” page found in the Pages screen on the Fenly Backend.
From the “About Us” page backend, you can update the existing generic content with the built in text editor. Include information on your mission or talk about the people and communities you help. You can also include extra images via the “Add Media” button or add a link to your organization’s main website.
Virtual Food Drives
The magic of Fenly goes far beyond Individual or Team fundraisers. With Fenly your food drives have officially entered the 21st century. Not only can Fenly help you run Virtual Food Drives, your drives can also be customized to fit your organization’s exact needs.
Customize Your Food Drive Products
Part of the Fenly system is the ability to select your own customized items available for “purchase”on the Virtual Food Drives.
To get started, head to the Products link found in the left navigation menu. From here, you will see all the products available for your Virtual Food Drives.
We have already set up a few standard items to get you started, but each item can be customized further and you can also add additional items.
To add an item, click on the “Add New” button on the top. To edit an item, just select it from the list. Either way, you will end up on the individual Product page.
First, you will want to set the product title. Each product must also have a “featured image” which can be uploaded via the box on the right. You can further customize a product via the “product fields” box.
The “Is General Donation?” checkbox allows you to set up a monetary donation option instead of an actual product. We recommend keeping at least one “General Donation” item on your product list to allow for individual monetary donations during the food drive.
Setting a subtitle allows you to put a small description below the title when the product it shown in the food drive’s product grid on Fenly. Finally, set a price for your product.
For best results, we recommend setting prices based on your wholesale buying prices which will help donors see the value of their donation but also as a way to increase donation size.
As a final note, Virtual Food Drive products are only meant to help as a visual representation of your food drive efforts. With Fenly, you can download reports on which items were selected by your donors, but ultimately, all products are converted to dollar amount donations. These donations are not restricted to the purchase of the individual items selected by the donor.
Email Notifications
Email notifications are back! We will be replacing the previous automatic email notifications to newly registered Users with a new feature that allows for more flexibility. And if you’re a new Fenly customer, Email Notifications will already be in your Dashboard.
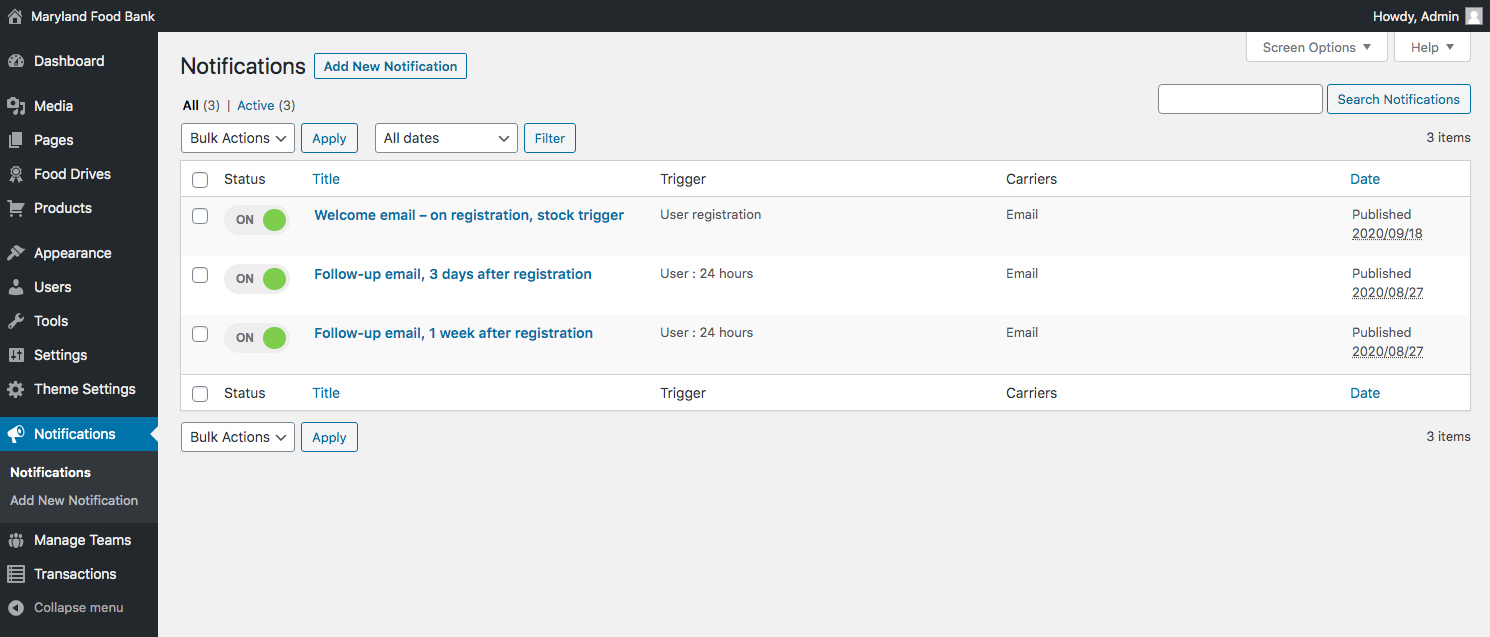
Edit Current Notifications
We’ve set up emails that are triggered when a User has registered on your Fenly website:
- First, a Welcome Email sends within an hour of the User’s registration.
- A follow-up engagement email to Users 3 days after their registration.
- And 7 days after User registration, another follow-up email will deploy to encourage sharing and gathering donations.
You have the ability to edit these or leave them as-is. To edit:
- Go to Admin Dashboard / Notifications
- Click the desired Notification from the list
- Feel free to edit the Admin title of the Notification
- Leave the Trigger set on User registration
- Under the Email Carrier, you can edit the Subject line and Body content.
- Text formatting and adding images are available
- Merge tags can be added to pull in various User information, like their ID, email, First and/or Last name, and more advanced features to come
- The Recipients are already set so the User is the one who receives the email – {user_email}
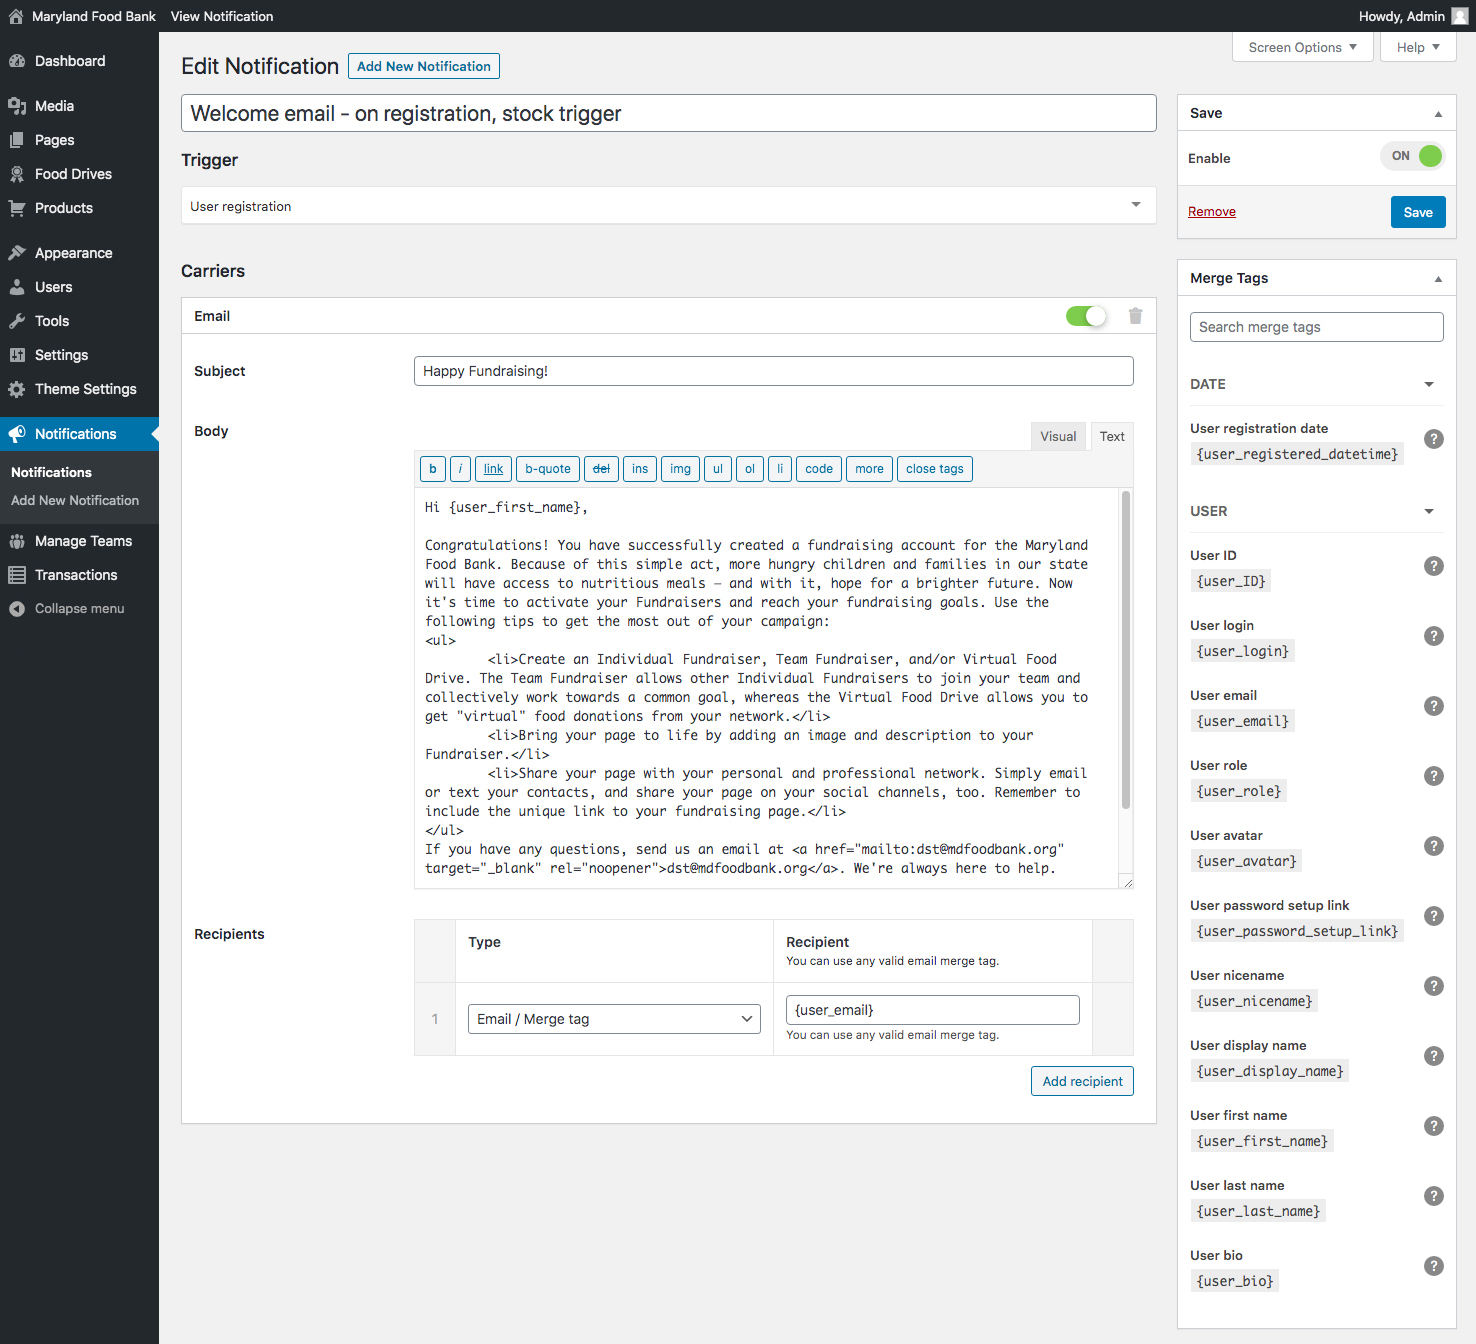
- Hit Save when updates are completed.
If you have any questions or need help with Notifications, please don’t hesitate to contact help@fenly.org
Add New Notifications
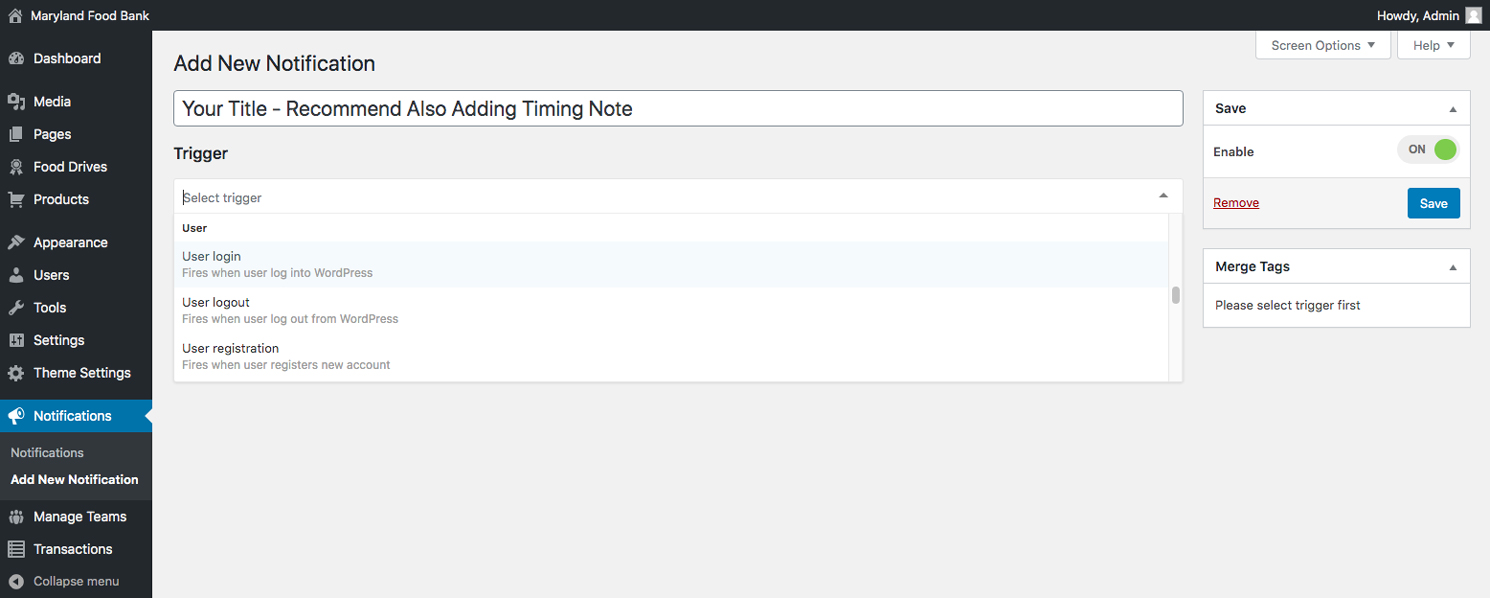
You can also set up and edit your own emails. Here’s how:
- Go to Admin Dashboard / Notifications
- Click Add New Notification
- Create an Admin title for the Notification (this will only be seen by the Fenly Admin)
- Select a Trigger. We recommend only using the following User types. We will be building this out further in the future:
- User registration (to add to the Notifications which are already set)
- User login
- User logout
- Click Add New Carrier and select Email
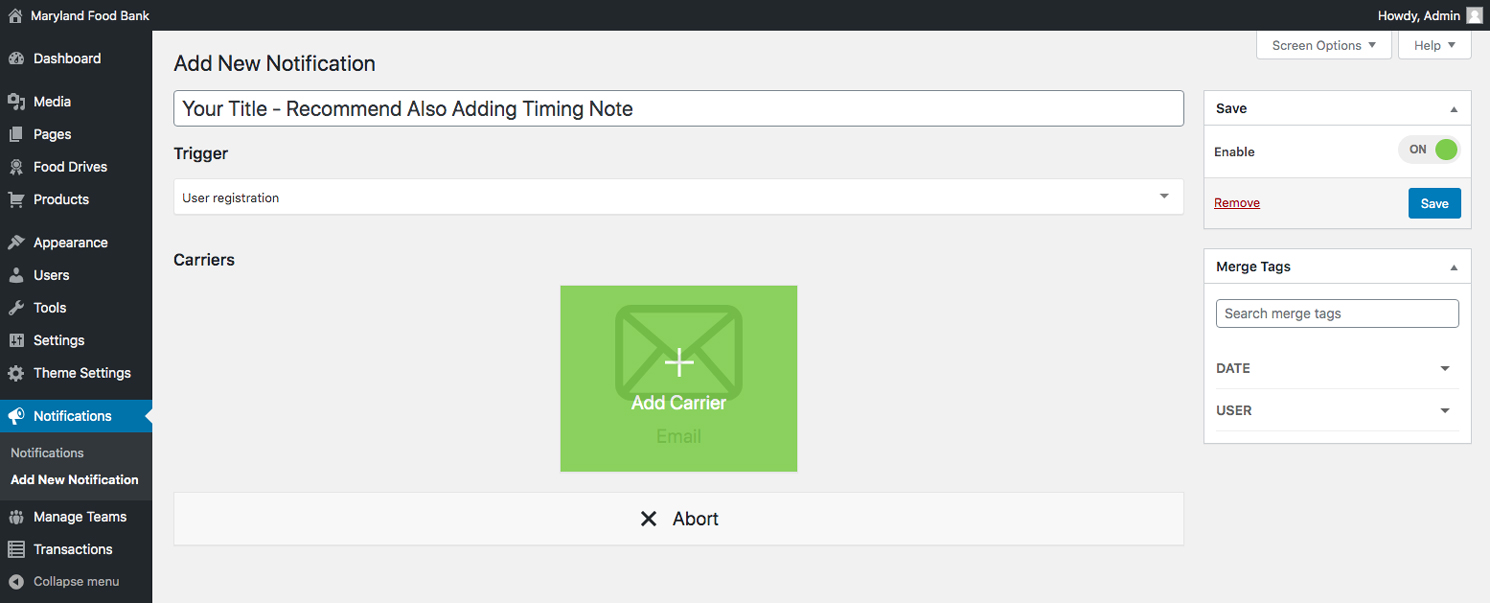
- Add your Subject and Body
- The Body can have stylized text and images
- You can also choose to add merge tags from the Merge Tags dropdown
- To set the Recipients, leave the Type as Email / Merge Tag and add {user_email} to the Recipient field
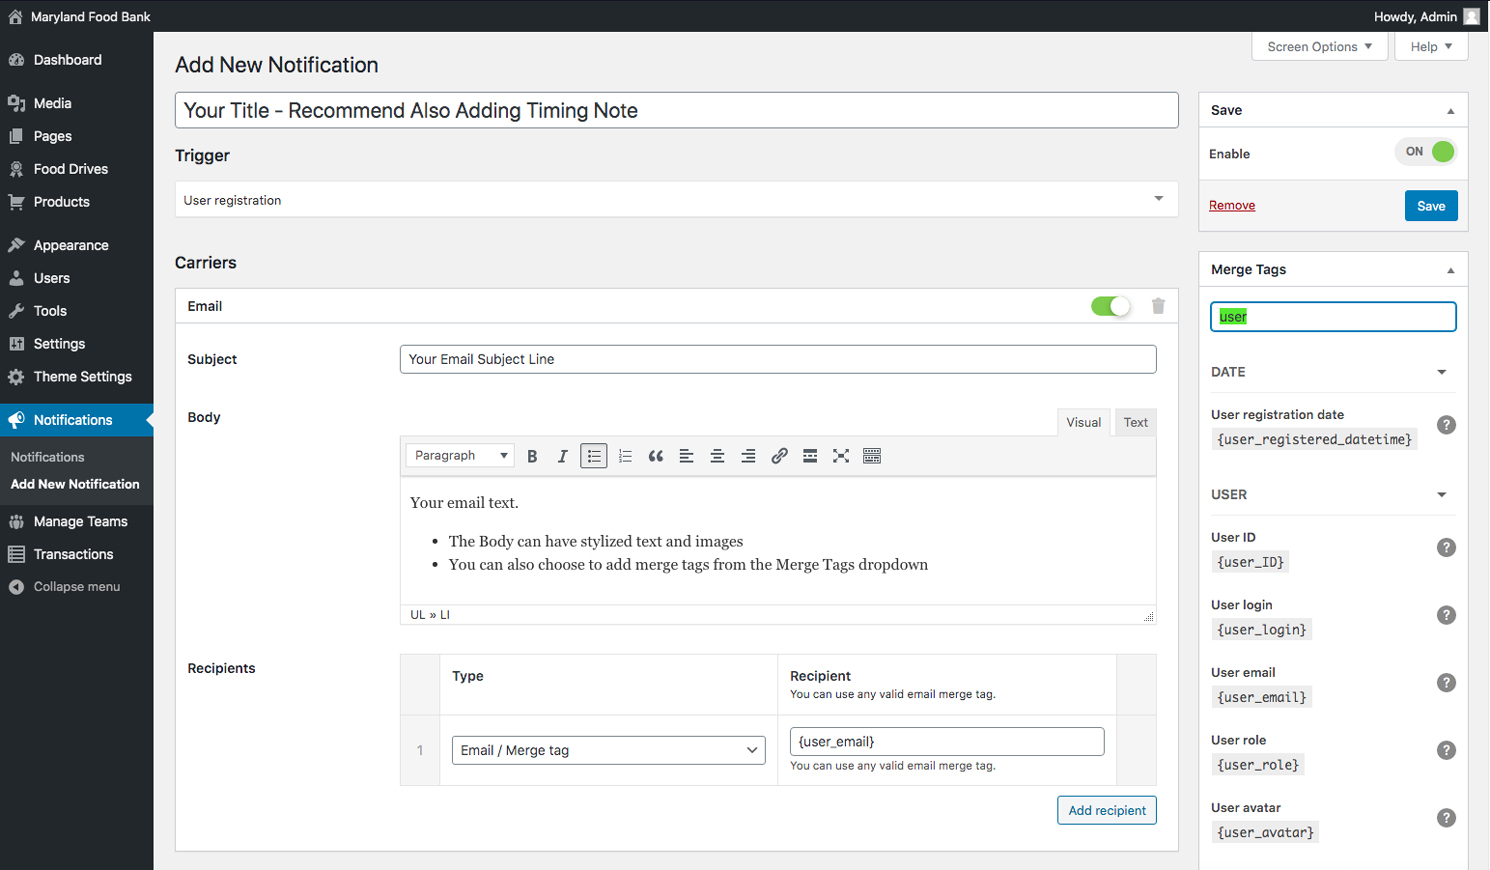
- When completed, make sure Enable is set to on and click Save
If you have any questions or need help with Notifications, please don’t hesitate to contact help@fenly.org
Creating Fundraising Campaigns
Setting up a New Fundraising User Account
Fenly makes it super easy for your supporters to set up fundraisers on your behalf. It also gives you the ability to crowdfund and run Virtual Food Drives directly for your organization. The process is similar for both you and your supporters. It’s easy and quick so you’ll be set up and raising funds in no time.
There are three fundraiser options — Individual, Team, and Virtual Food Drives. Every user/email registered through your Fenly site can create one of each fundraising type. For example, if a supporter wants to set up multiple Virtual Food Drives for your organization, that supporter will need to register a new user account for each Virtual Food Drive.
You will not be able to create any fundraising page for your organization with the email address you use to log in to your Admin account. Therefore, if you would like to create a Crowdfunding campaign directly for your organization, you will need to create a new user with another email address.
The first step to creating a fundraising user account is to visit your main Fenly site homepage — Yoursite.fenly.org. If you are currently logged into the Admin account, you will first need to click Logout via the link in the top right menu.
From this point forward, the process of creating a fundraiser is exactly the same for both you and your supporters.
On the homepage, scroll down to the three boxes labeled – Individual Fundraiser, Team Fundraiser, and Virtual Food Drive. Select which fundraiser type you would like to create and click the corresponding button.
You will be directed to the registration page. Fill in your name (or the name of your organization), an email address (different than the one attached to your Admin account), set a password, and click “Register Now.”
You will now be on the Fenly User Dashboard and ready to create your new fundraiser.
Fundraiser Options
Individual
The first fundraiser option on Fenly is the Individual Fundraiser. This is a great way to let supporters engage in Peer-to-Peer fundraising. It can also be used as a Crowdfunding page for your organization.
To create an Individual Fundraiser, head to the Fundraising User Dashboard (by signing in to Fenly or clicking the Dashboard link on the top right navigation menu). Click the Start Your Campaign button under the Individual Fundraiser option.
Fenly allows for the customization of each fundraiser. With a Individual Fundraiser page, you can set basic information, like the campaign name and a custom URL. You can also set your fundraising goal. Finally, upload a profile image for the page and use the text box to set a “Short Description for Your Individual Fundraising Page.”
Finally, select “Save and Close.” Your fundraiser is now live on Fenly! To make any edits to the fundraiser, just click the “Edit my Individual Fundraiser” button on the User Dashboard.
Team
Team Fundraisers are another fundraising option on Fenly. With Team Fundraisers, your supporters can collectively work together to reach a collective fundraising goal.
You can either choose to join an already existing team or create a team via the buttons on the User Dashboard. Fundraisers can join any team just by going to the Team Fundraiser page and clicking the “Join This Team” button.
When creating a new Team Fundraiser, you will be able to set a Team name and a custom URL. You can also upload a Team Image and select a Banner Color to represent the Team. You will need to set a Team Fundraising Goal which all donations to your Team members’ Individual Fundraising pages will go towards. Finally, set a Start and End Date for your Team Fundraising Drive.
Once you click “Save and Close,” your Team Fundraising page will be active. To make any changes to the Team page, just head to the User Dashboard.
Virtual Food Drive
One of the most interesting features of Fenly is the ability to create Virtual Food Drives. These food drives can be started by any supporter or directly by your organization. They allow donors to actually see how their money can make a difference by selecting products from the food drive to “purchase.”
To create a Virtual Food Drive, head to the User Dashboard and click the “Start a Virtual Food Drive” button. With Virtual Food Drives, you have a number of customization options.
Basic Information includes setting a food drive name, custom URL, adding a company/organization name (if desired), and uploading a food drive profile image. You can then set your overall Virtual Food Drive goal. Virtual Food Drives are set by default to always be open, but you can set a start and end date if desired.
Finally, you can select the products available for “purchase” during the Virtual Food Drive. You can add as many products from the list as you would like. As an Admin of your organization, you can also customize the products available for selection via Fenly’s Admin Dashboard.
Just click “Save and Close” to launch your Virtual Food Drive. Changes to the Virtual Food Drive can be made at any time via the User Dashboard.
Changing Fundraising Campaigns
Deleting Campaigns or Users
It is not possible to directly delete campaigns or whole user accounts. This is due to Fenly’s user based pricing and also to prevent any accidental deletion of accounts.
Rather than deleting campaigns, we recommend editing or updating campaigns, which you can do from the Fundraiser User Dashboard. The Support Center sections below walk you through the process.
There are occasionally times when you will want or need to delete campaigns or whole user accounts. Some examples might be – if you have stale users with no active campaigns over the last year, have users who have set up offensive campaigns, or have a user request the complete deletion of their account. To remove these users and their campaigns, you will need to contact Fenly directly to request the deletion of the user accounts.
Editing Campaigns
All campaigns on Fenly can be edited and updated at any time. This is a great way to reuse previous campaigns without needing to create a completely new user account.
Campaigns can be edited from the User Dashboard by both yourself and your supporters. You are able to edit the campaign name, description, banner color, upload a new image, update your custom URL, and set a new start and end date on expired campaigns.
You can also set a new campaign goal. Previous donations will still remain linked to the campaign by default and be factored in to your goal percentage. Previous donations will also show up in the Our Donors scroll box.
Resetting Individual Campaigns & Virtual Food Drives
Fenly Individual Campaigns & Virtual Food Drives can be both edited, as explained above, and reset. Resetting a campaign allows you to unlink previous donations to that campaign. This will reset the goal meter and the Our Donors scroll box.
Donation resets can only be done by the Admin and not directly by your supporters on their campaigns. It is also not possible to reset donations to a Team campaign as these donations are linked both to Team fundraising and Individual supporters.
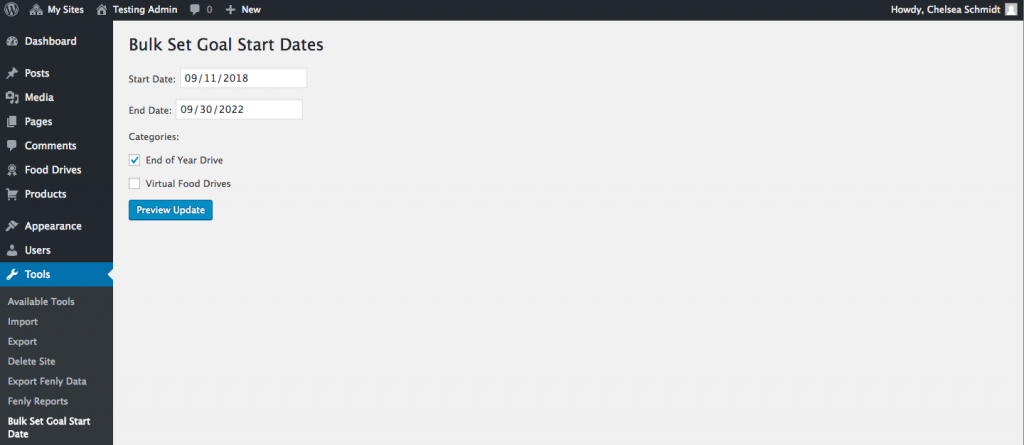
To reset Individual Campaigns and/or Virtual Food Drives, hover over the Tools option in your Admin Dashboard navigation menu and select Bulk Set Goal Start Dates. Here you can bulk set a new start date which will unlink any donations made previously to Individual Campaigns and Virtual Food Drives.
This is a universal reset and will be applied to ALL Individual Campaigns and Virtual Food Drives created by any users, unless you select a category to restrict the reset. By setting category restrictions, you can reset just some campaigns or even a single campaign.
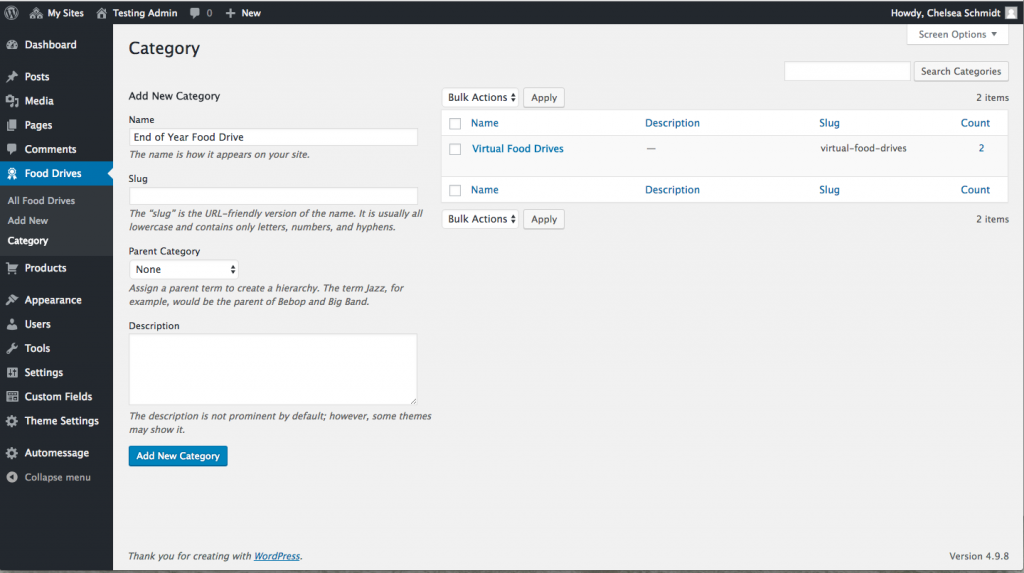
To control exactly which Individual Campaigns and/or Virtual Food Drives to reset, you will need to create a custom campaign category. Using the left navigation menu, hover over Food Drives and select the Category option. Here you can add a new category – for example “End of Year Food Drive” or “Individual Campaigns to Reset.” You only need to set a Name and if you’d like a Description. The slug for your custom category will be created automatically.
Once you have created the custom category, select All Food Drives under the Food Drives navigation option. This page will list not only Food Drives but also all of your Individual Campaigns. For each food drive or campaign you’d like to reset, hover over the name and click Quick Edit. Make sure the check box for your custom category is selected and click Update.

Once the Individual Campaigns and Virtual Food Drives you want to reset have been properly categorized, you can head back to the Bulk Set Goal Start Dates via the Tools option in the navigation menu. Unlink all previous donations by selecting a start date after the last donation made to the campaigns. Set an end date as far out as you would like. Now just select the Category to reset and click Preview Update.
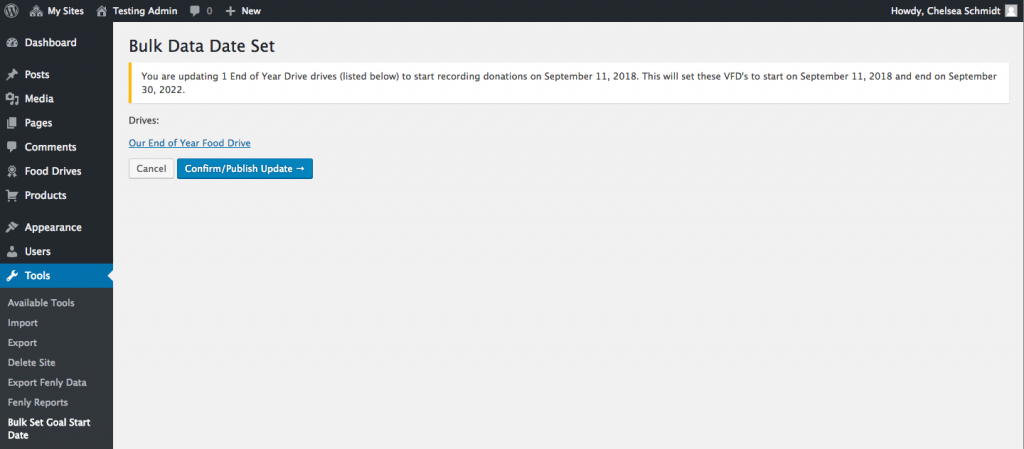
Review the food drives and campaigns that will be reset and if everything looks correct, hit Confirm/Publish Update.
Using Your Fenly Data
Fenly Built-in Reports
Not only can Fenly help you raise more funds for your organization, the platform can help you track, analyze, and understand your online fundraising efforts.
With Fenly’s built-in reports, you can get an overview of all your Team fundraisers, Individual fundraisers, and Virtual Food Drives at any time. To access the reports on your Fenly backend Admin Dashboard, hover over Tools in the left navigation menu and select Fenly Reports.
On this screen, you will be able to see all current and expired Individual fundraisers, Team fundraisers, and Virtual Food Drives created through your Fenly site, whether created by you or one of your supporters.
For each fundraiser or drive, you can click on the name to see a in-depth report of the money raise, individual transactions, and the start and end date. You can even edit fundraisers from this screen, just by clicking the “Edit Drive” option.
Fenly Data Export Options
Using the Fenly export options, you can go well beyond the built-in Fenly reports. Everything tracked through Fenly can be accessed and downloaded through a CSV file on the Fenly data export page. This page can be found on the left navigation menu by hovering over Tools and selecting Export Fenly Data.
Aggregated Drive Data
With the “Aggregated Drive Data” export option, you can get all the data information on your Virtual Food Drives.
A more advanced feature of Fenly is the ability to categorize Virtual Food Drives, which can be helpful when tracking specific outreach campaigns or holiday-time drives. Under the Aggregated Drive Data export option you can either select Virtual Food Drives by category or select “All Categories” to access all current and expired Virtual Food Drives.
In either case, the downloaded CSV file will include who started each Virtual Food Drive, the start and end dates for the drive, the goal, total donations, and the percentage of the goal raised.
Transaction Details
The Transaction Details export option is designed to show you transaction data for any one specific Individual fundraiser or Virtual Food Drive. Team fundraisers are not included in this export, but refer to the information below to view this data.
Using the Transaction Details export, you only need to select a fundraiser or drive from the dropdown menu and then click the “Download (CSV)” button. The exported file will include all the transaction information for donations to that fundraiser.
Transaction Details by Team
Similar to the above Transaction Details export option, the Transaction Details by Team export is setup to pull transaction data from one specific Team fundraiser at a time.
Again, you only need to select the Team fundraiser from the dropdown menu and download the CSV file.
Download All Raw Transactions Details
Your Fenly data is important and we want to make it easy for you to get that data into your main CRM or other donation management tools.
The Download All Raw Transactions Details export option is the most detailed CSV file available in your Admin Dashboard. It includes data on drives, fundraisers, transactions, etc. It also includes a number of options to customize the exported data.
Select a start and end date for your file. Next, choose whether to include “Transaction Splits/Team/Drive Information” or not. With this option, you can decide either to show the donation details of each donor along with the Individual, Team, or Drive they donated to or hide the information so your CSV file just has the donor details alone. Finally, you can filter your export by drive type _ VFD only (Virtual Food Drives) or Individual/Team (fundraisers) only.
Download All Raw Transactions Details With Product/Drive Breakdown
With Fenly’s unique Virtual Food Drives, you can get even more data on what your donors value and prioritize. By letting your donors select “products” during the Virtual Food Drive, you can highlight the unique needs of your community and also see what type of items your donors are more likely to give.
While Virtual Food Drive donations in Fenly are unrestricted and not tied to the “products” chosen by your donors during the donation process, it can still be valuable to see this data.
The Download All Raw Transactions Details With Product/Drive Breakdown export option allows you to see the product breakdown and donor details across all your food drives in a certain time period. Simply select your start and end dates and download.
Download All Opt-In Email Data
During the donation checkout process, donors are asked if they would like to opt-in to receive occasional updates. Donors who agree to updates should be added to your email list. To make the process easier, we have created an export option for the emails of these donors in particular.
Using the Download All Opt-In Email Data export, you simply need to set a start and end date before downloading the CSV. You can then easily import these names and emails to your main email list.